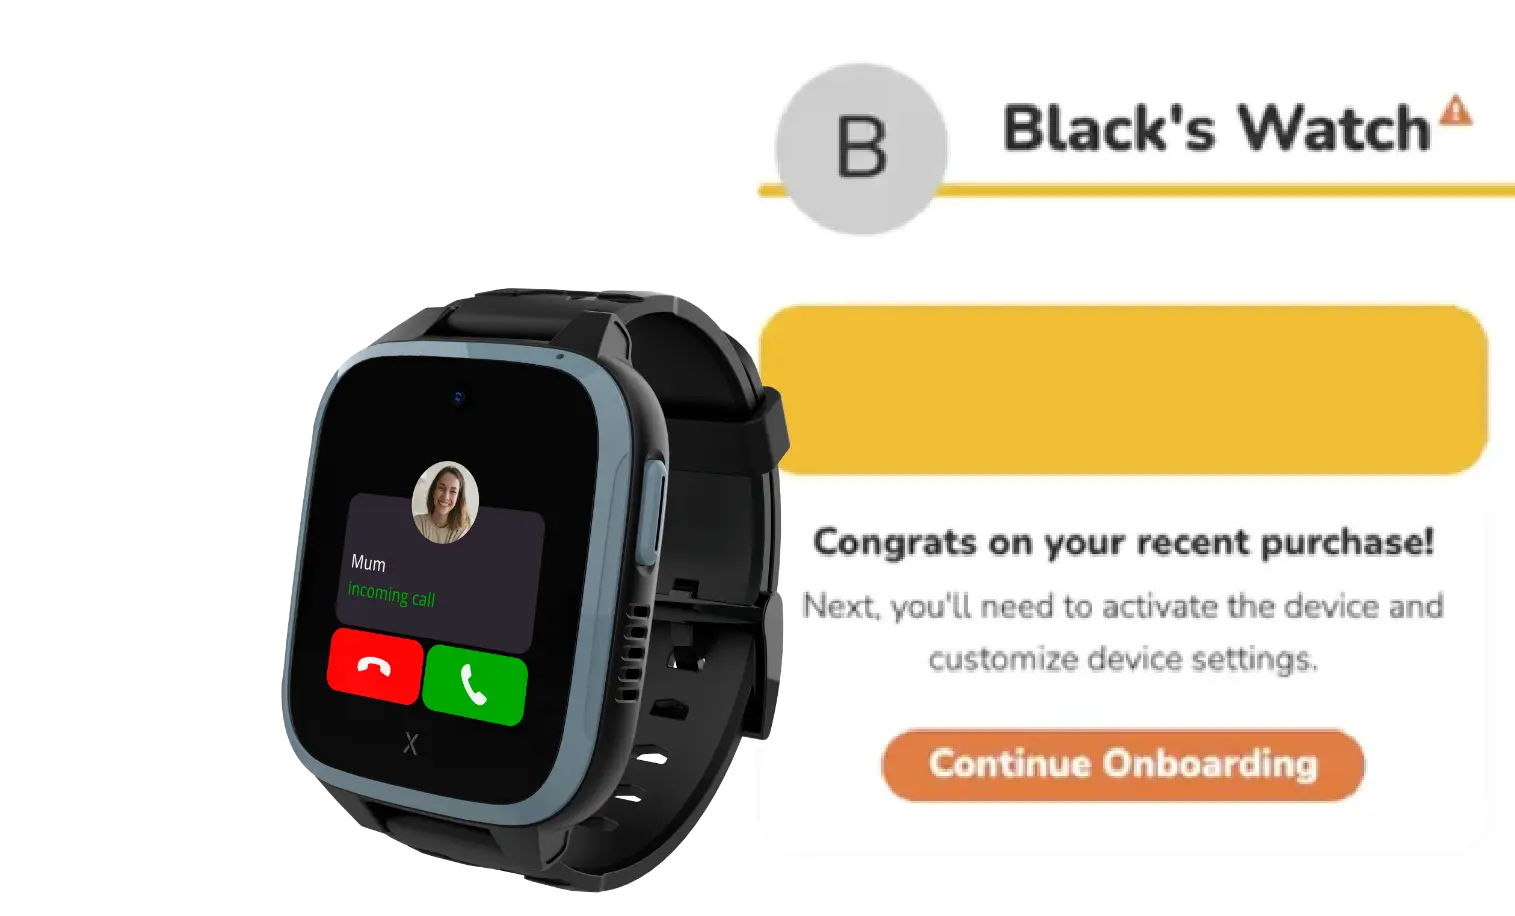
Now that you’ve purchased your Troomi Watch, it’s time to activate your phone number!
Log in to your Parent Portal account here: https://parent.troomi.com/
Once you’ve signed in, find the section that shows your child’s watch and Click “Continue Onboarding.” Then, a pop up will appear and you will need to acknowledge that you have already received your watch before proceeding. If you don’t have your watch yet, come back to this step once you do.
Click “Continue” to start activating the watch’s phone number. Then, click “Finish.”
Step 2: Install The Xplora App
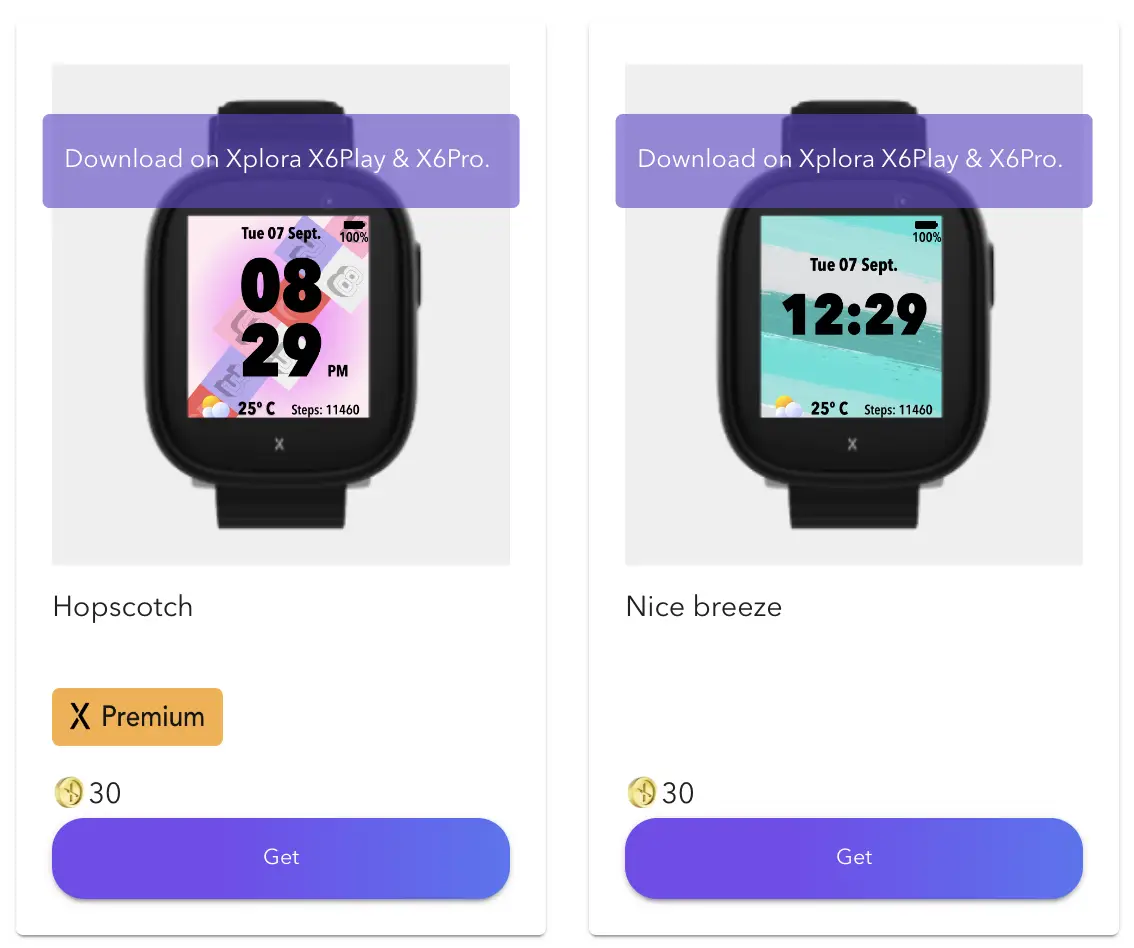
Download the Xplora app via the Google Play store or the Apple App store.
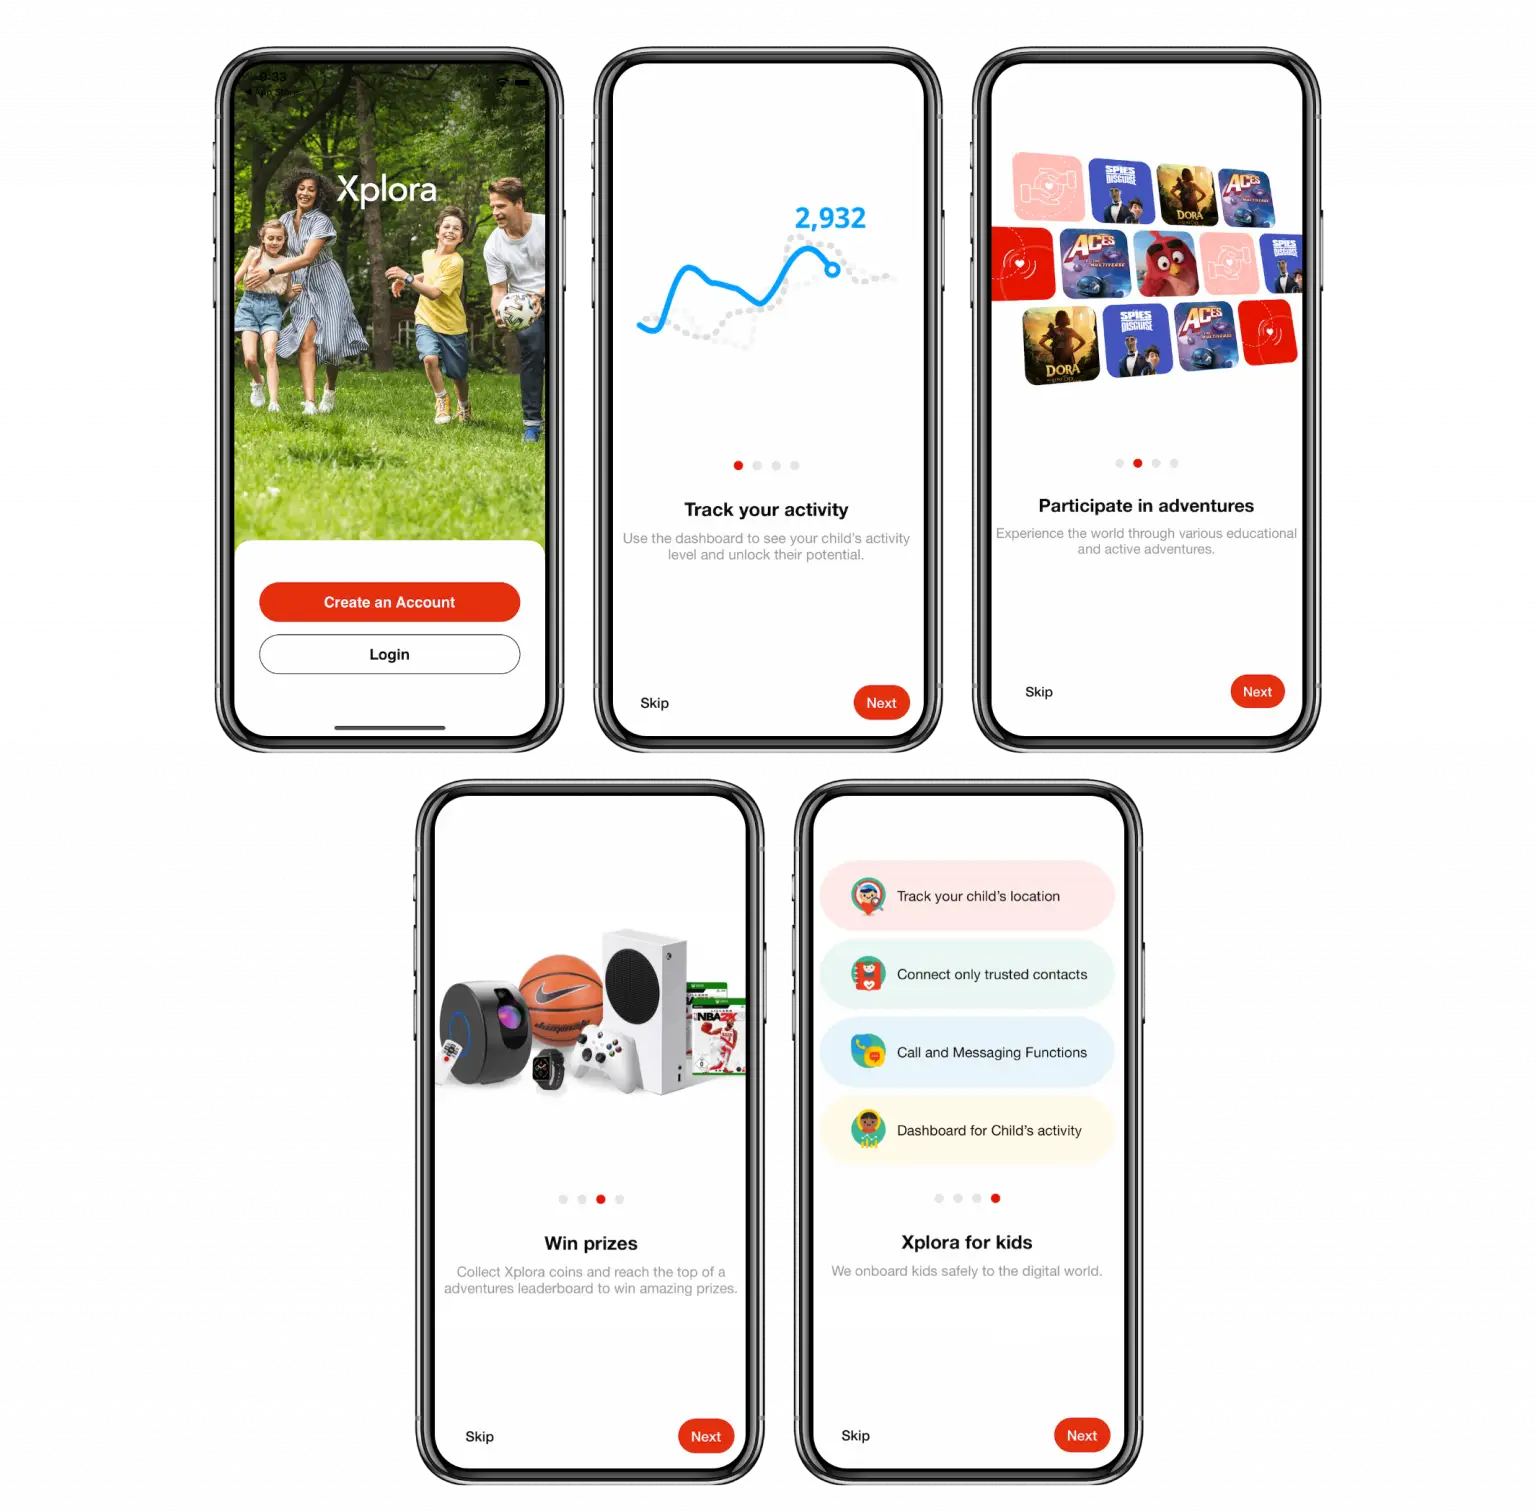
Step 3: Create Your Xplora Account
First, select “Create an Account.” The next four screens will provide you with valuable information about what the app can do. You can click “Next” to explore all four screens or simply click “Skip” to proceed to the next steps.
The info screens are as follows:
Track your activity
Participate in adventures
Win prizes
Xplora for kids
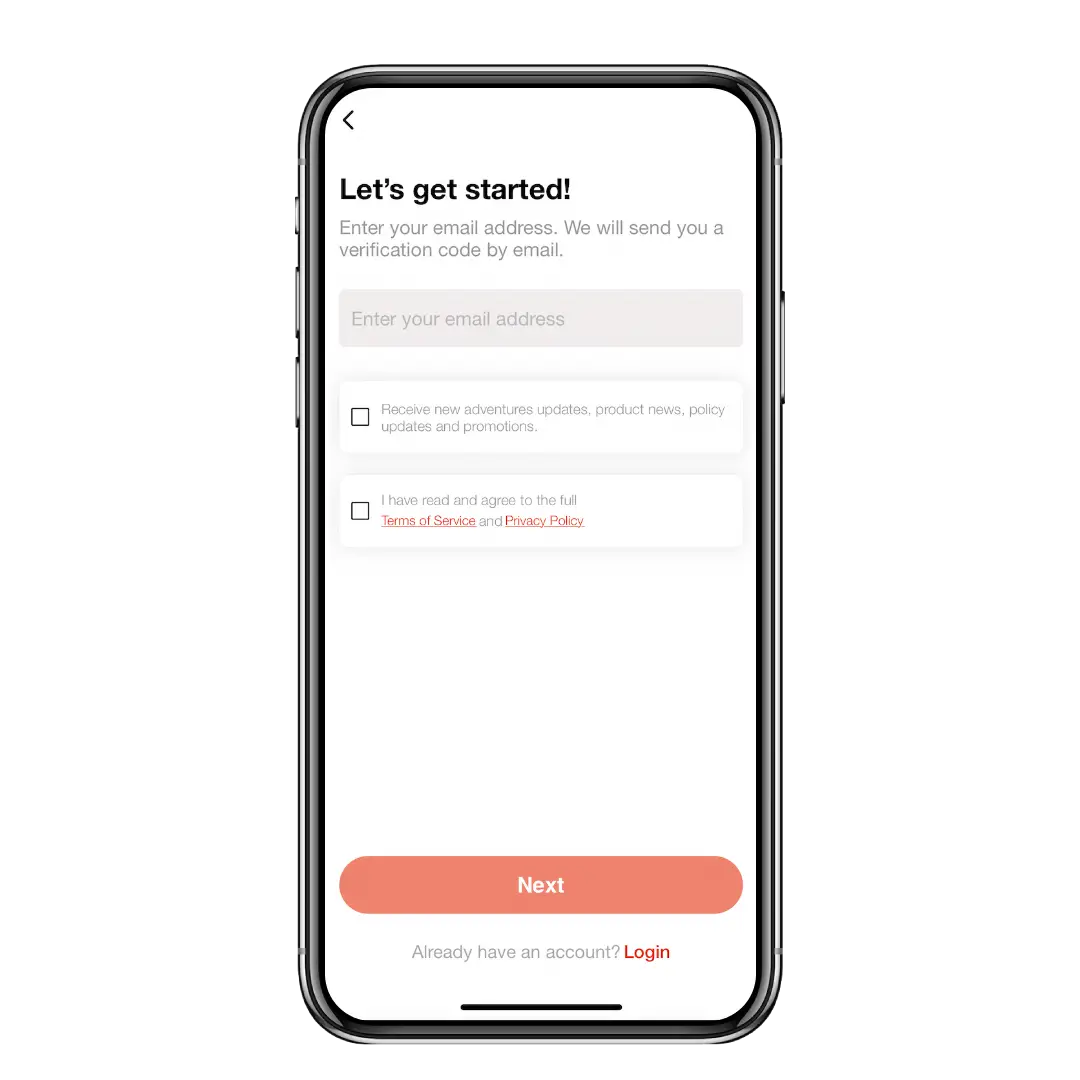
Step 4: Enter and Verify Your Email Address
Download the Xplora app via the Google Play store or the Apple App store.
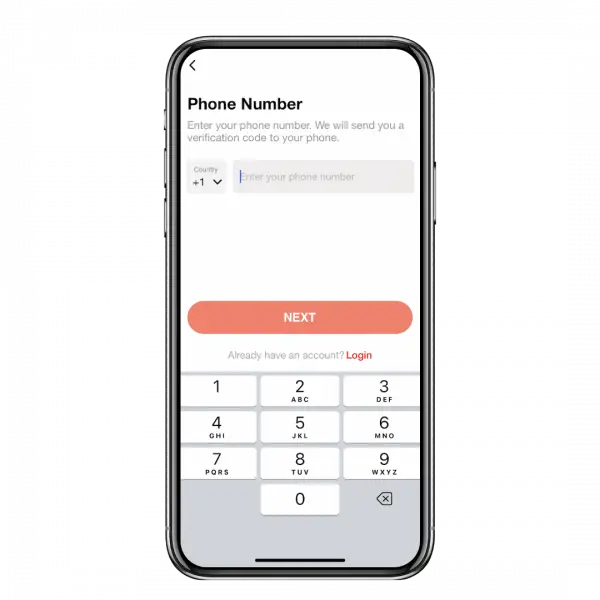
Step 5: Enter and Verify Your Phone Number
Enter your phone number (parent or guardian’s phone number).
Click “Next.”
The info screens are as follows:
Track your activity
Participate in adventures
Win prizes
Xplora for kids
Step 6: Enter Your Name
Enter the full name you want in your child’s watch contact list.
Click “Next.”
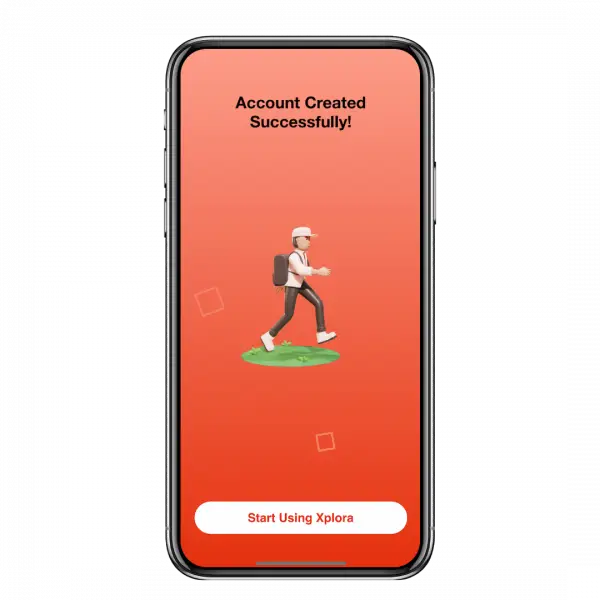
Step 7:
Account Created Successfully
Click “Start Using Xplora.”
This Xplora account is used to log into the Xploa App and the Xplora Activity Platform at https://goplay.myxplora.com/us/dashboard (See Step 16).
The info screens are as follows:
Track your activity
Participate in adventures
Win prizes
Xplora for kids
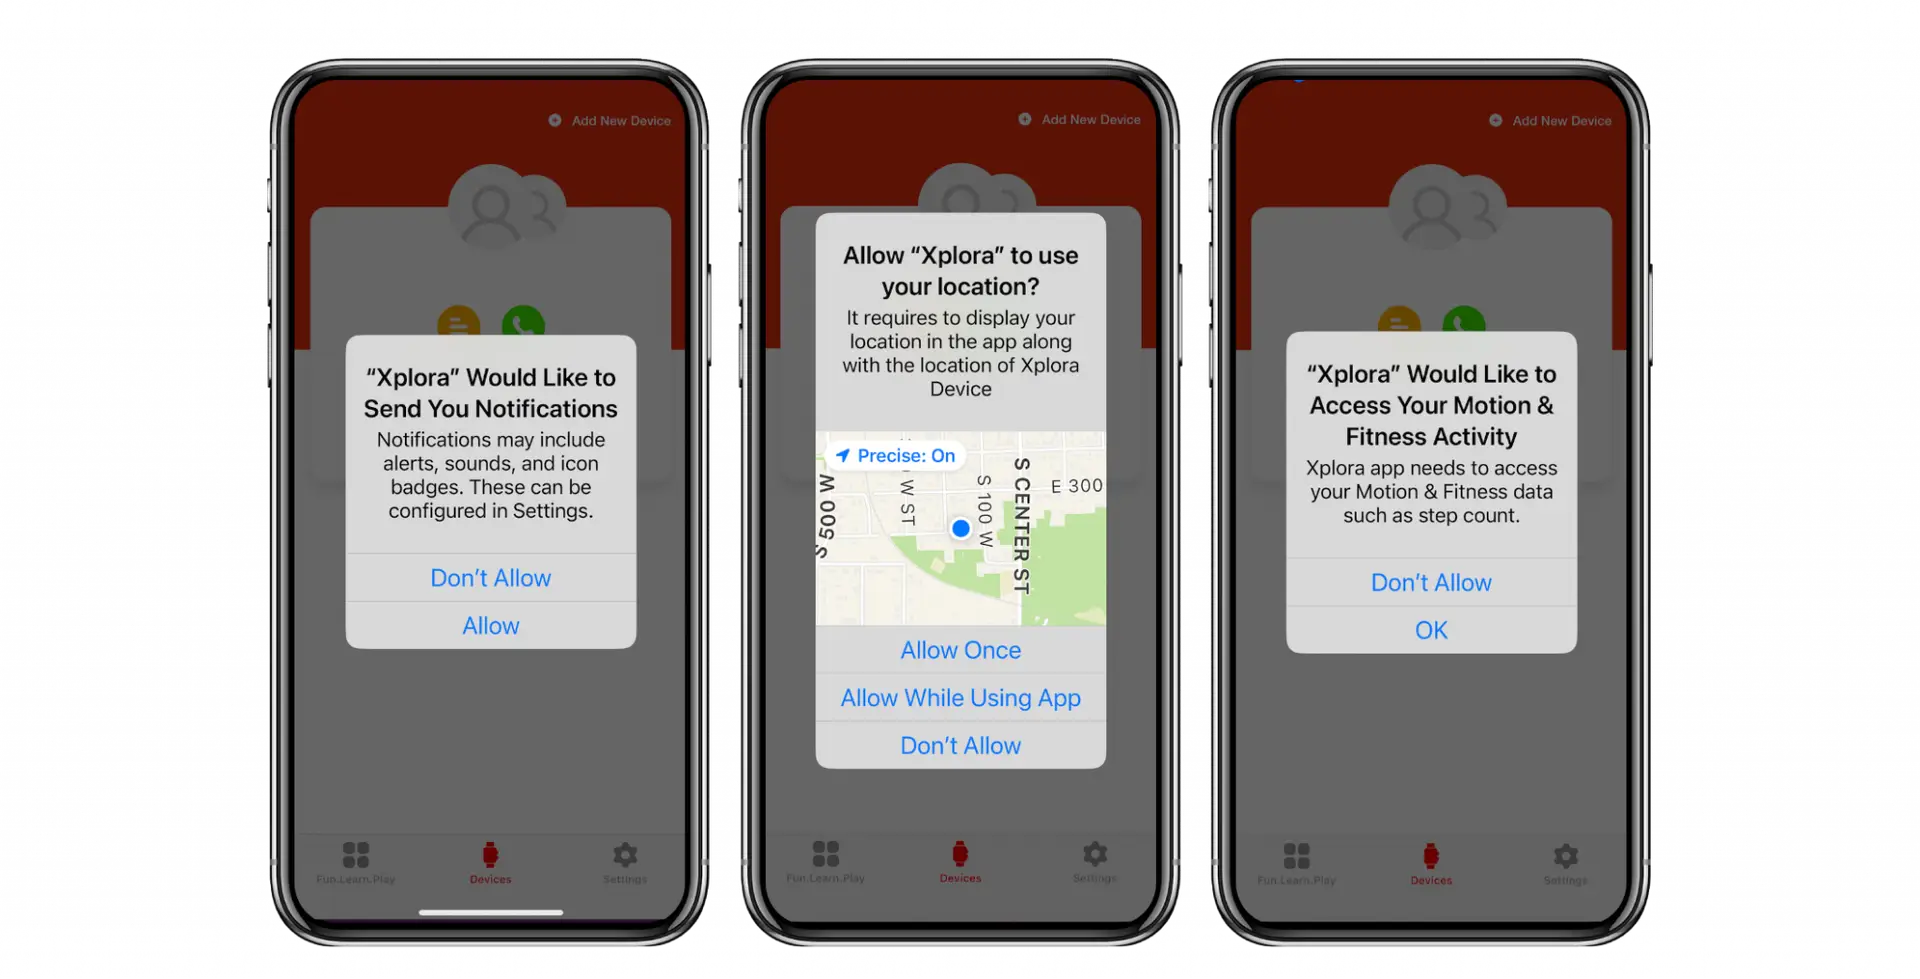
Step 8: Set Permissions
You will see a Notification pop up asking if you would like to receive Notifications from Xplora. Select “Allow.”
Then, you will see the Location Permissions pop up. Select “Allow While Using App.”:
Next you, you will see the Fitness Activity pop up. Select “OK.”
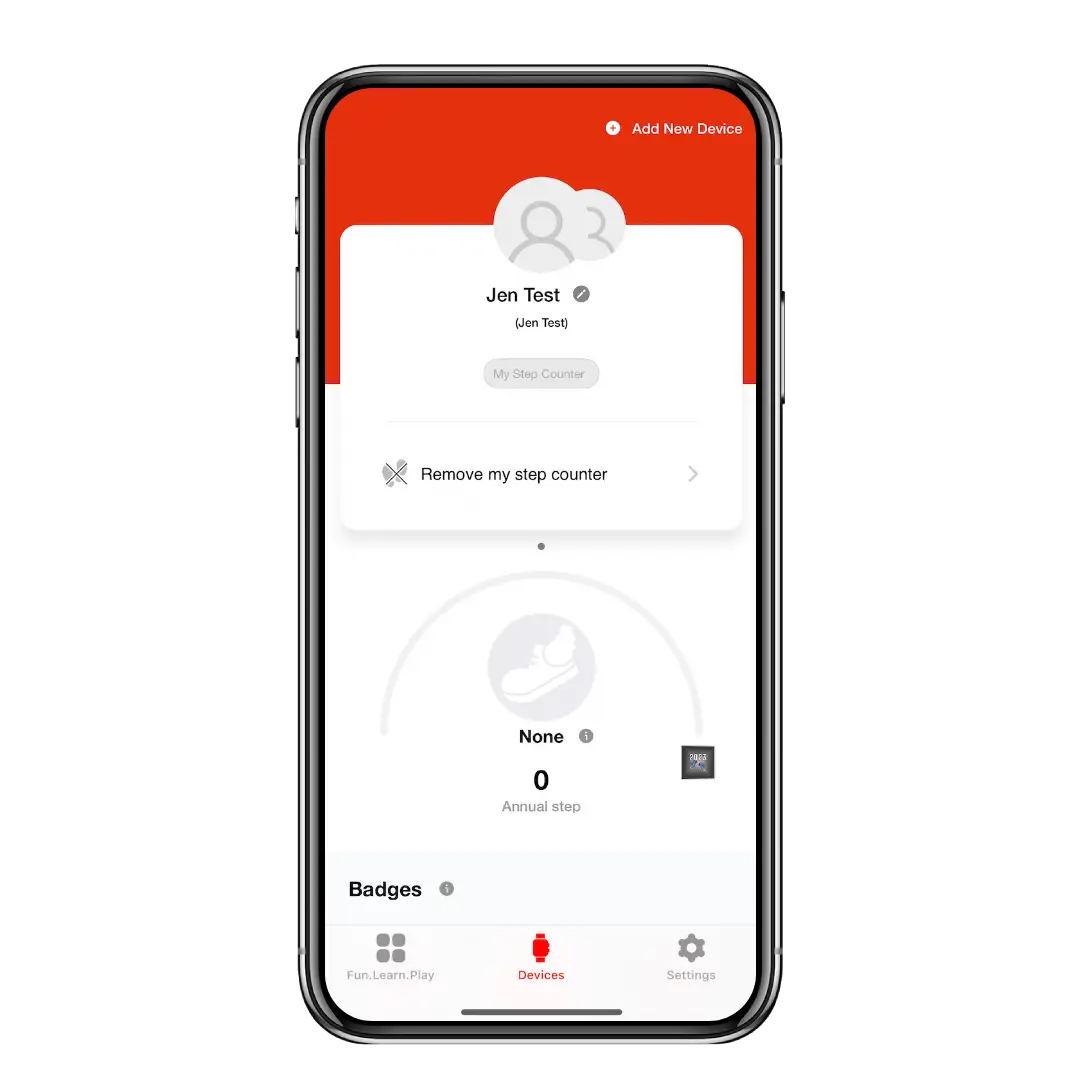
Step 9:
Xplora App Home Screen
You now have your Xplora account set up and you can add your child’s watch by selecting “Add New Device” in the upper right corner.
The info screens are as follows:
Track your activity
Participate in adventures
Win prizes
Xplora for kids
Step 10:
Make Sure Your Child's Watch Is Charged
Now that your account is created, make sure your watch is charged, so you can successfully link your child’s watch to the Xplora App.
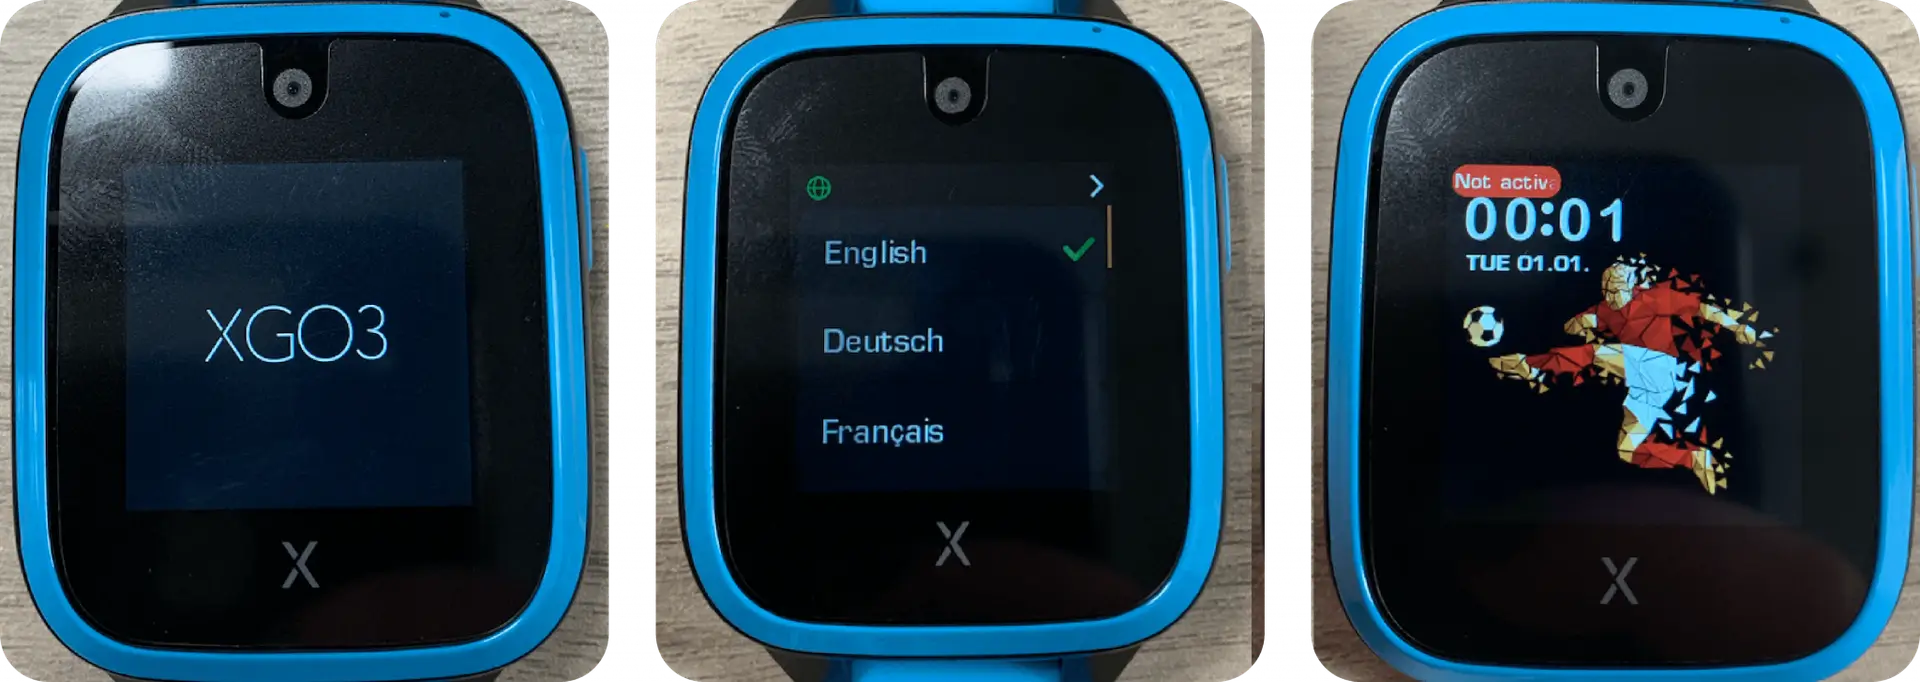
Step 11: Power Up Your Child's Watch
Hold down the power button until the watch powers up to the XGO3 screen. You will then be prompted to select your preferred language.
Select your preferred language and press the “>” symbol in the upper right hand corner. This will take you to the default watch display.
The info screens are as follows:
Track your activity
Participate in adventures
Win prizes
Xplora for kids
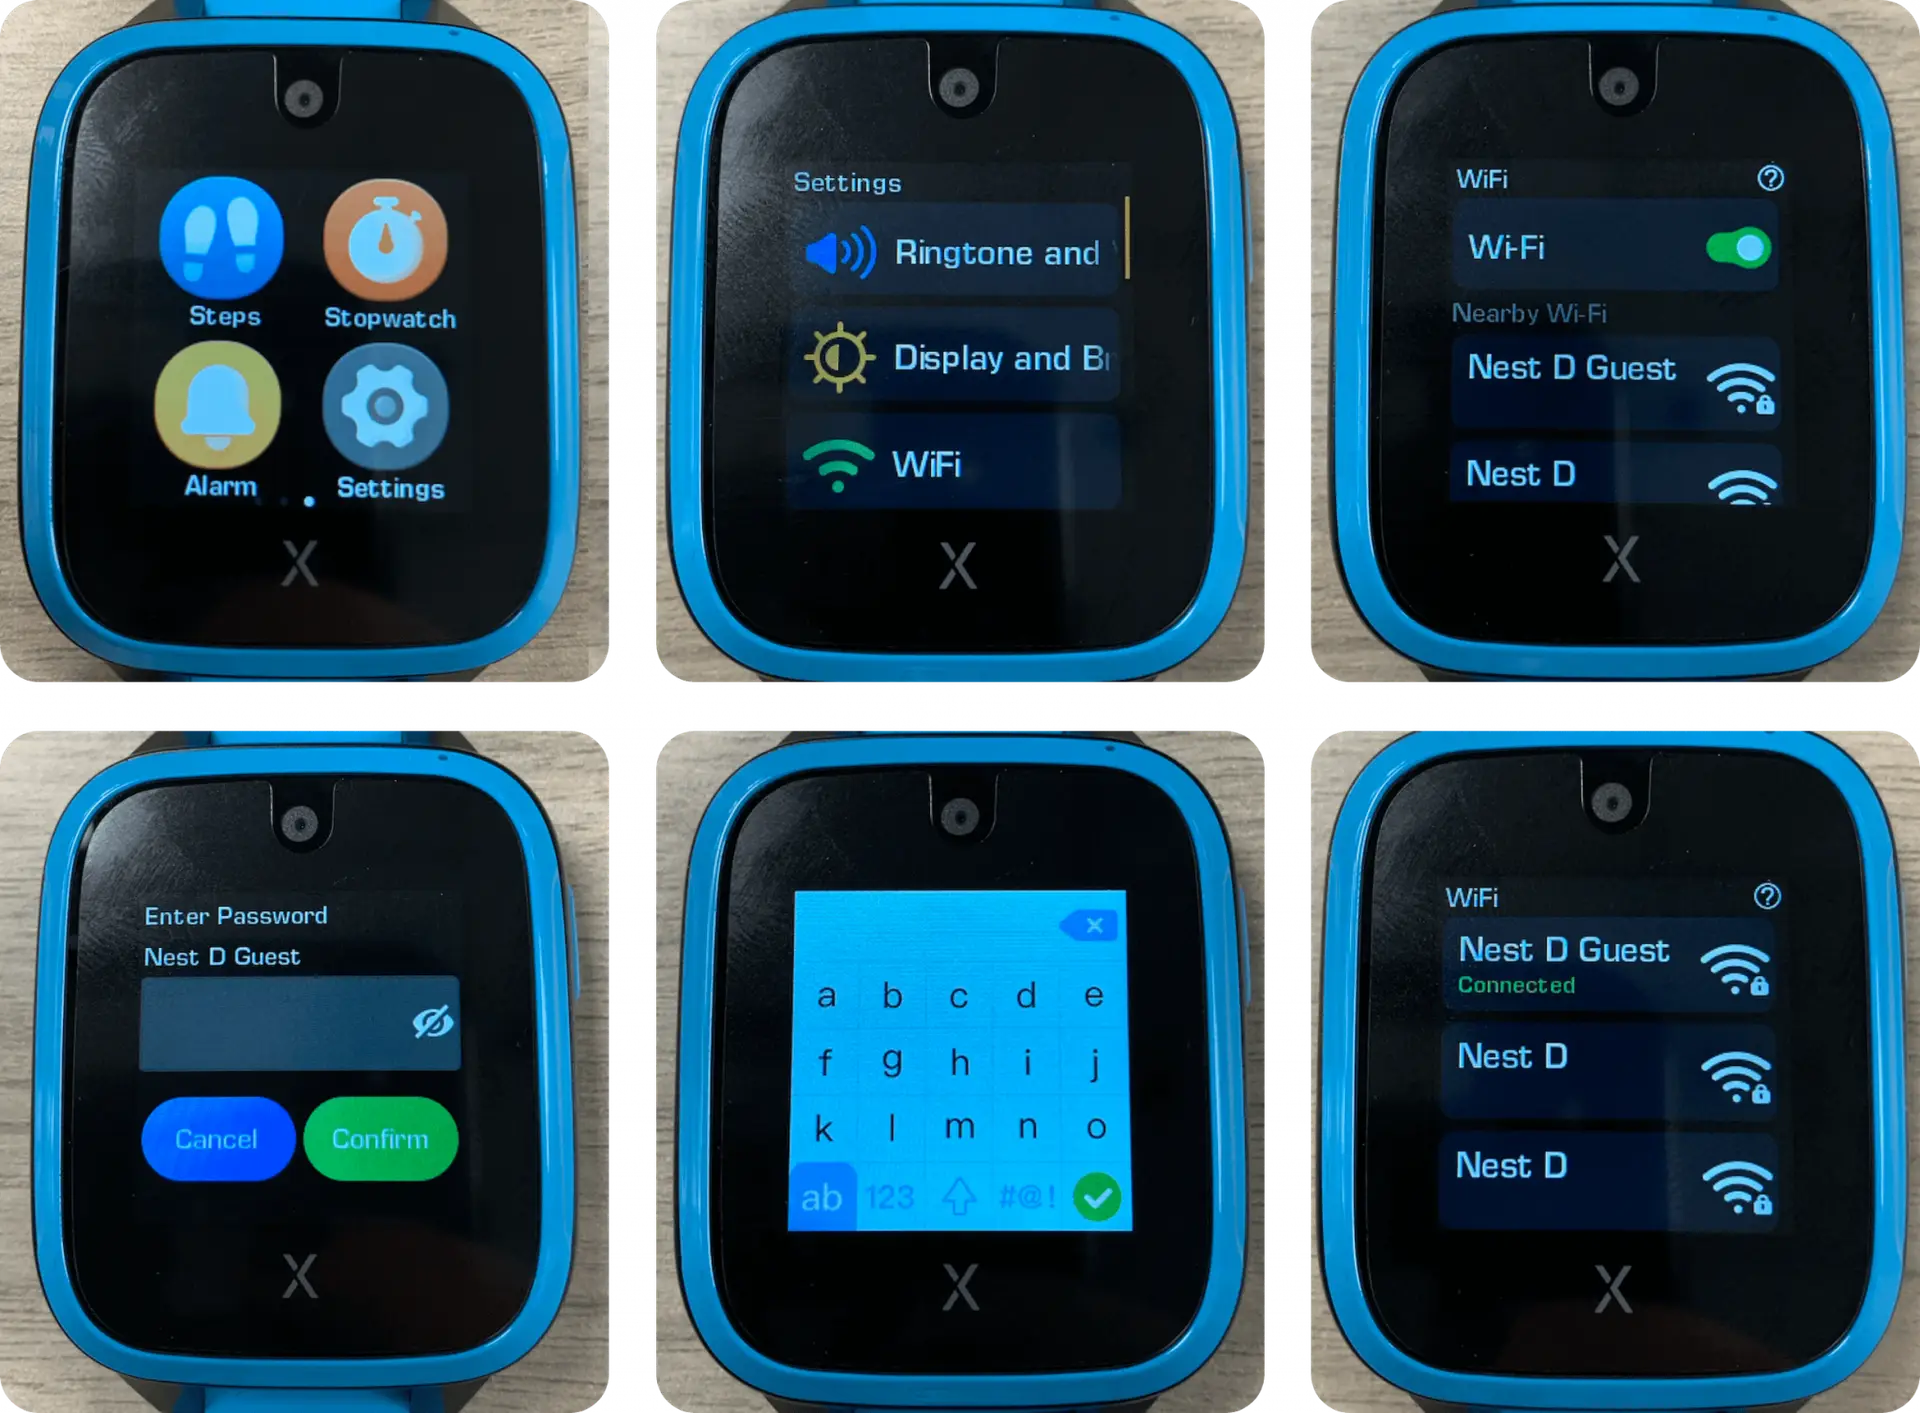
Step 12: Connect Your Child's Watch To Wi-Fi
Your watch must be connected to Wi-Fi to complete activation.
Swipe left on the watch twice until you see the Settings icon (looks like a gear). Click the Settings icon. Then, click “Wi-Fi.”
Toggle on to enable Wi-Fi. Then, select your Wi-Fi network, and enter your Wi-Fi password. Once you’ve entered your password, press the green check mark in bottom right corner.
Your watch is now connected to Wi-fi.
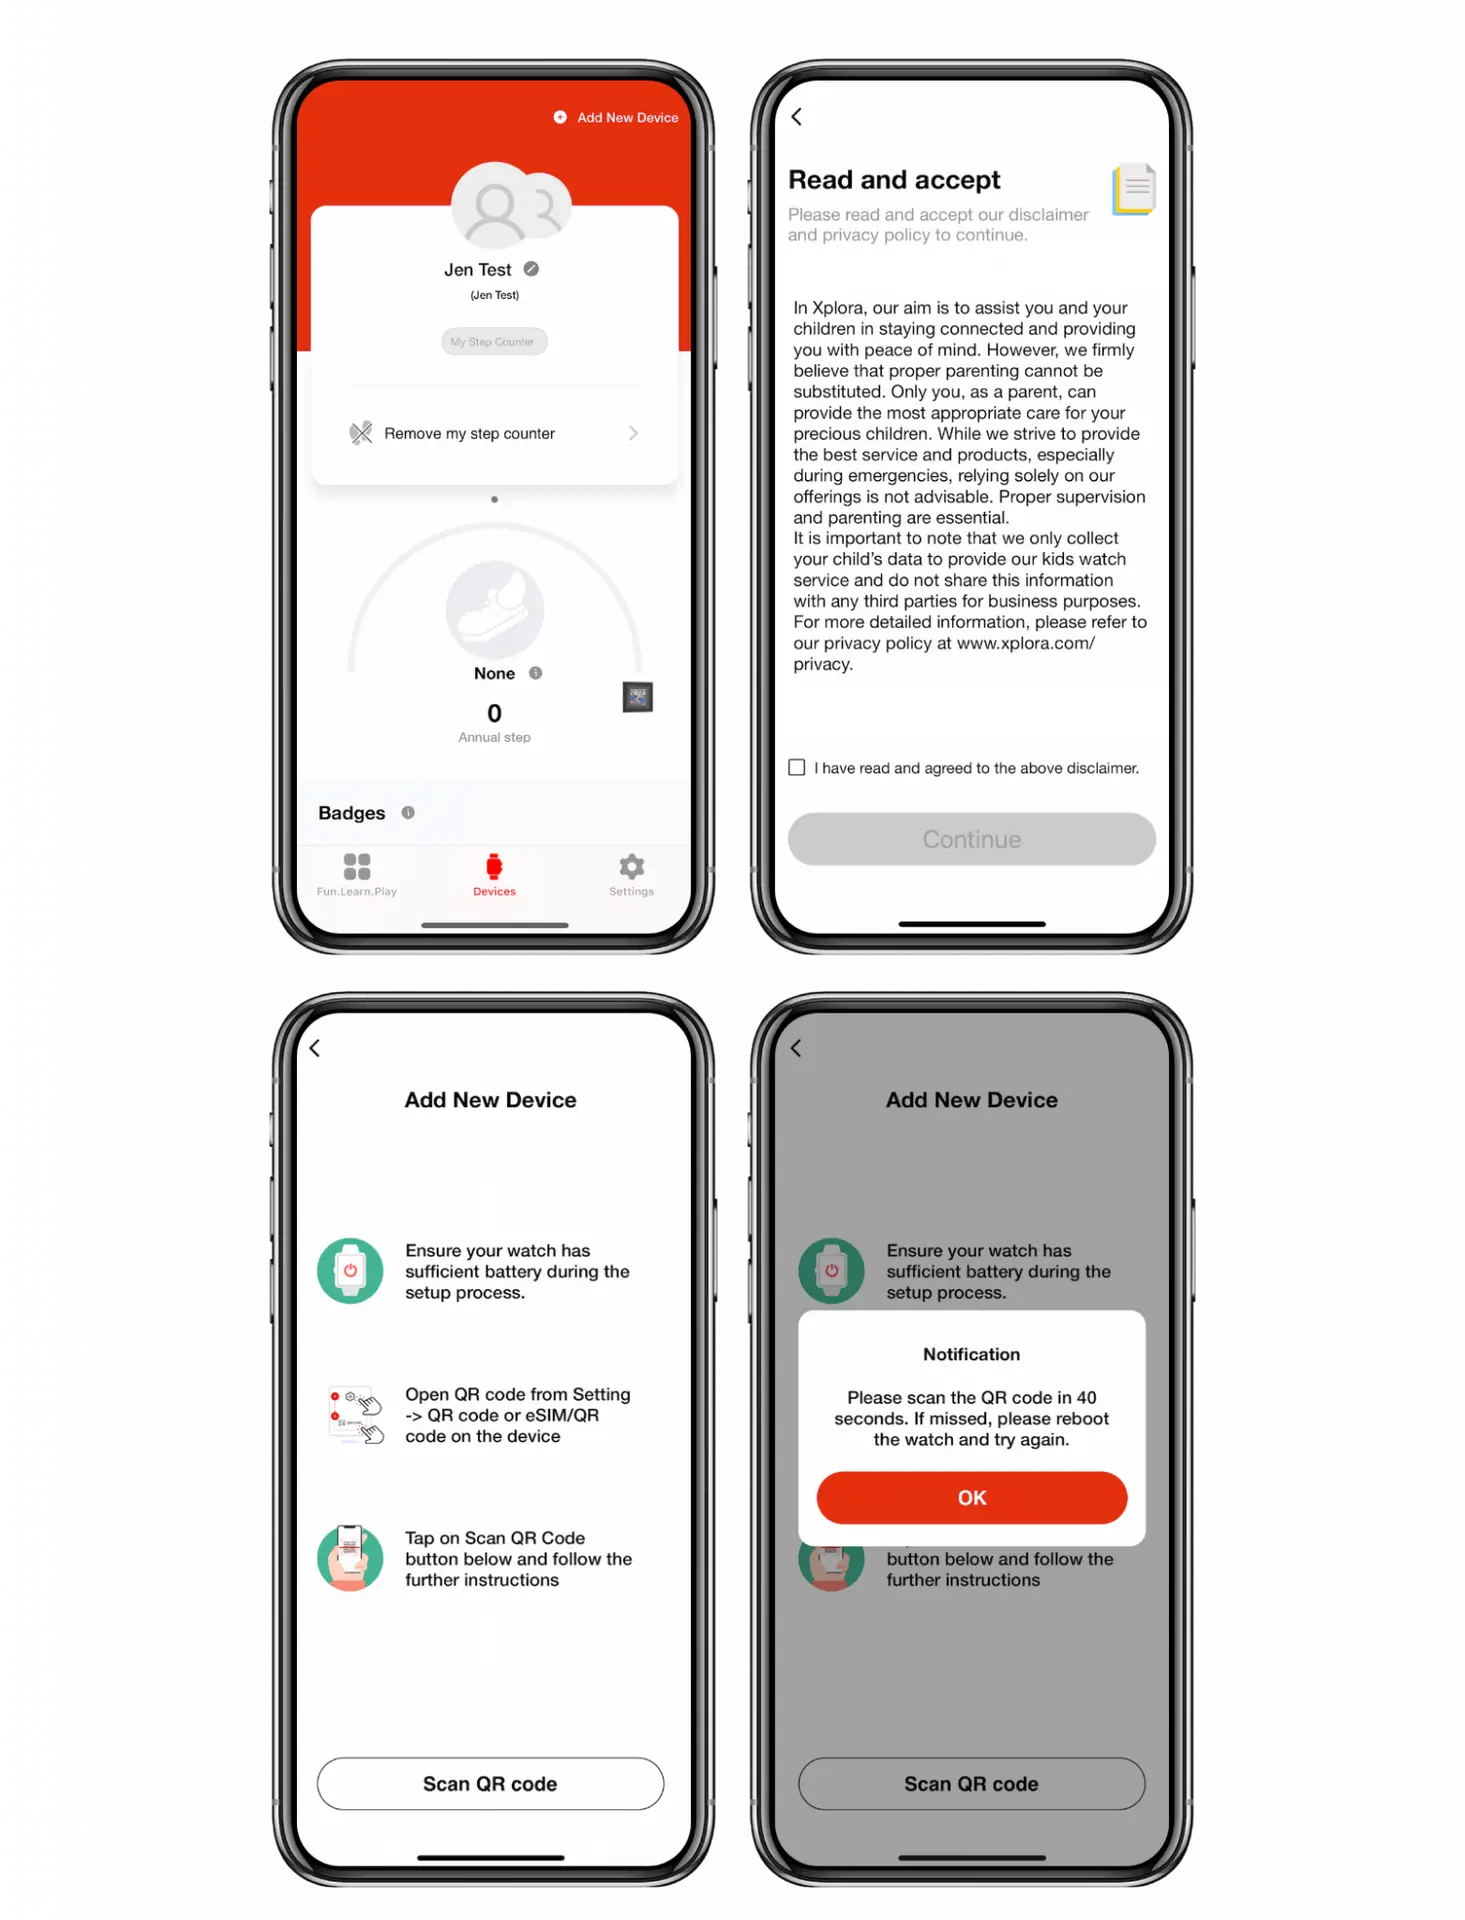
Step 13: Link Your Child's Watch to the Xplora App
From the Parent’s phone, open the Xplora App. In the upper right corner select “Add New Device.”
Read and accept the disclaimer. Press “Continue.” Make sure the watch is charged and connected to Wi-Fi.
Select “Scan QR Code.”
Before selecting “OK” open the QR code on the watch.
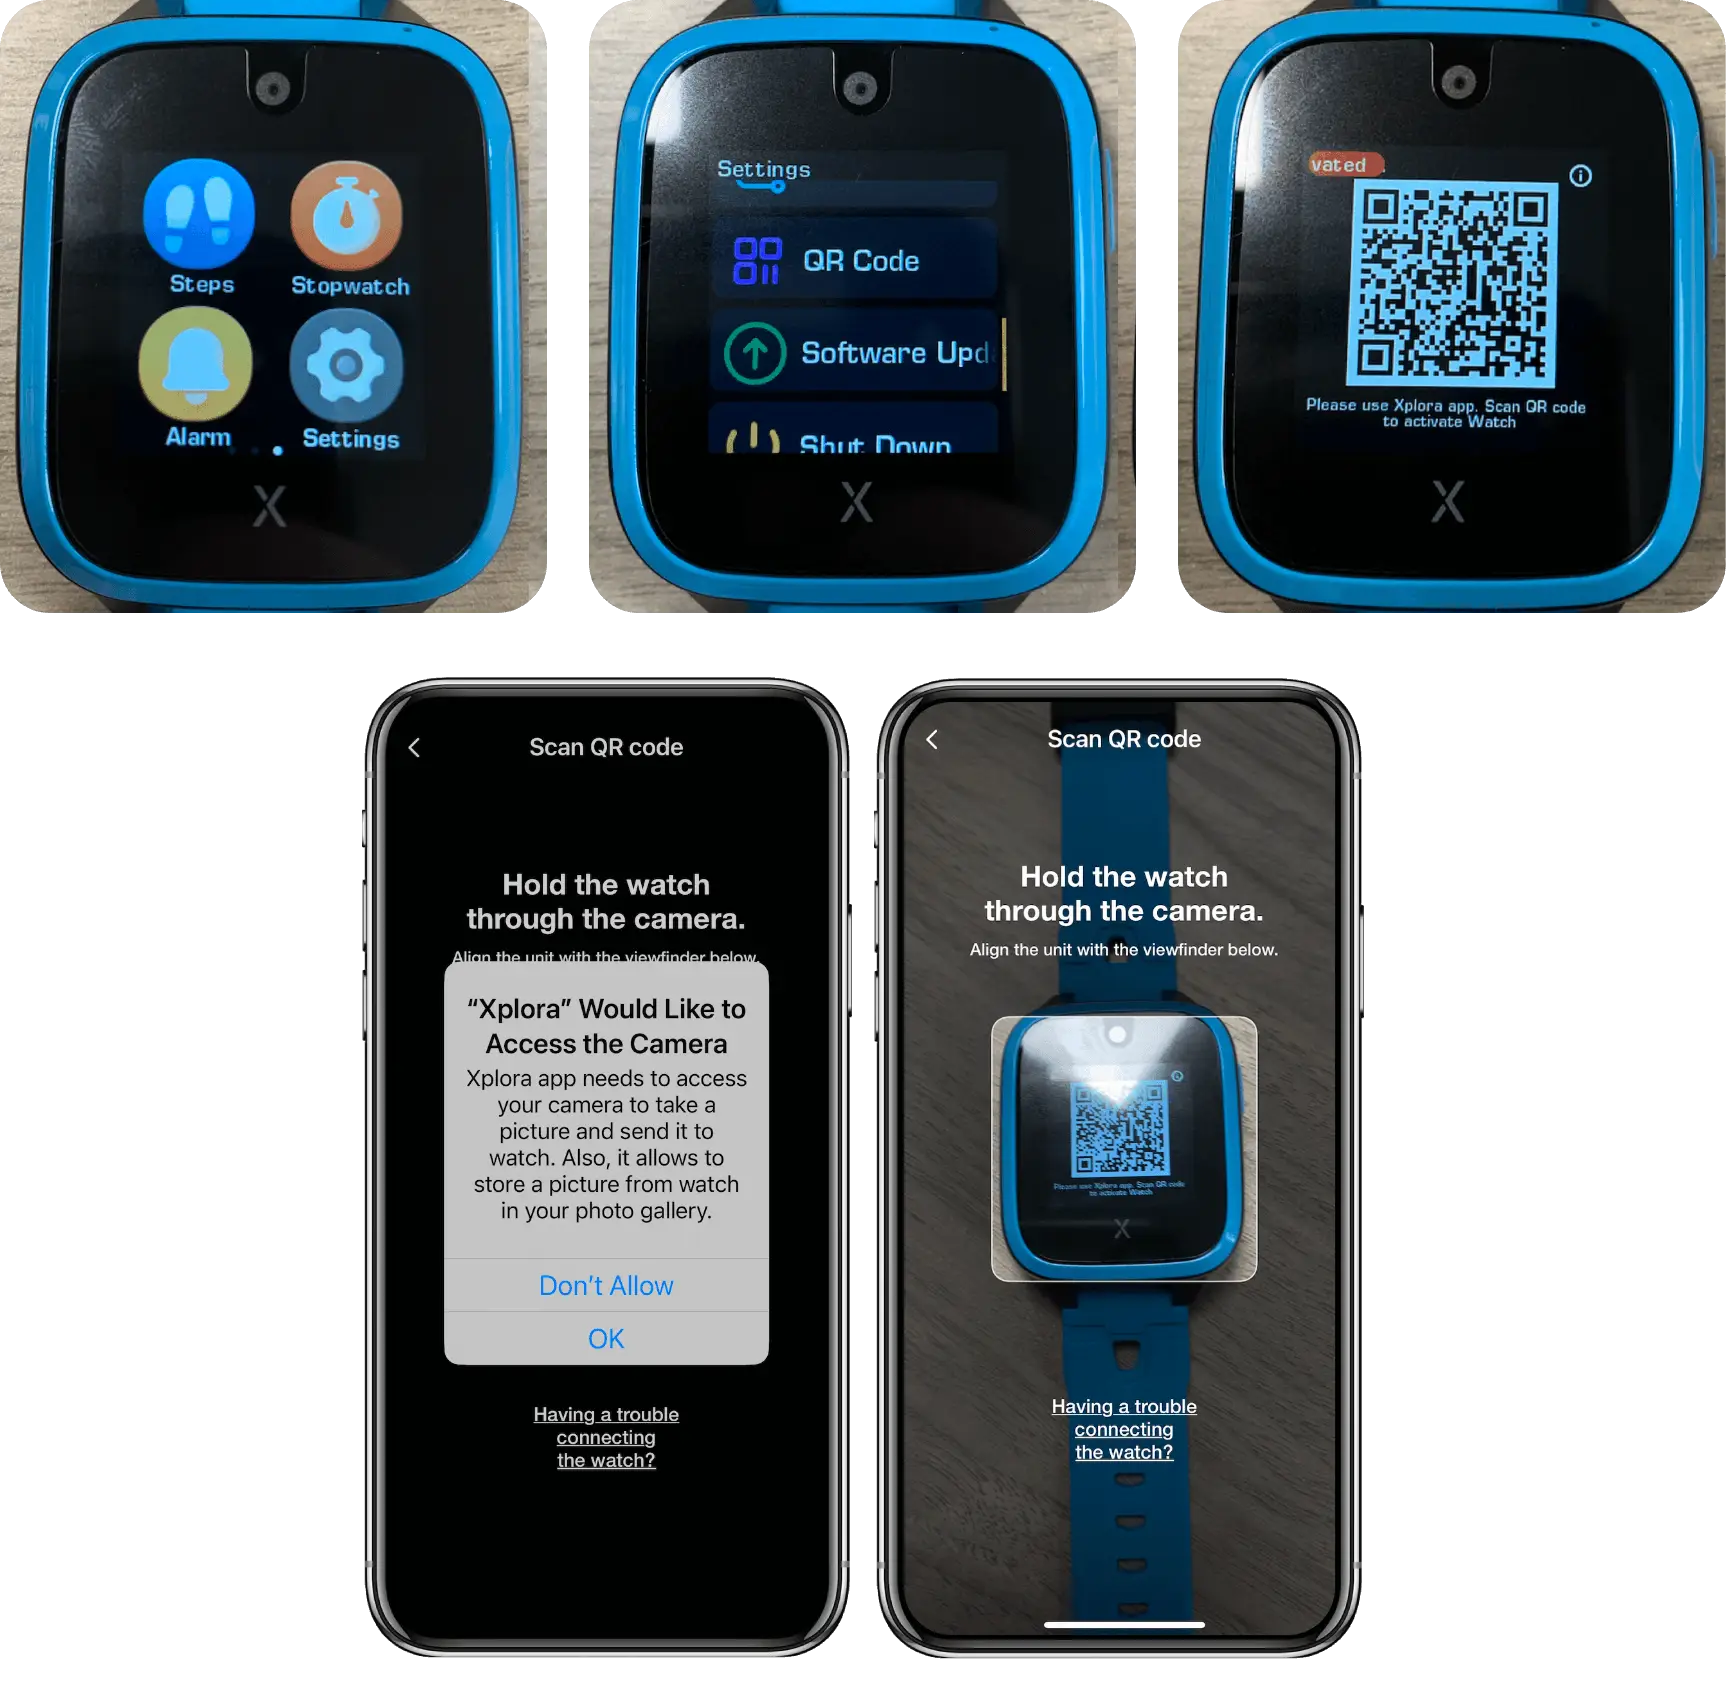
Step 14: Access the QR Code on Your Child's Watch
Swipe left until you see the Settings icon. Select the Settings icon.
Scroll down until you see the QR code, and select “QR Code.”
From the Xplora App, select “OK.” Then, pop up with ask you to allow camera access. Select “OK.” You have 40 seconds to scan the QR code. Once the QR code has been scanned, enter the phone number for the watch.
Enter your watch’s phone number. This can be found in Troomi’s Parent Portal.
Press “Next.”
Please Note: If your watch needs to be updated, you will see a notification on the watch. You’ll need to do this update before moving to the other steps.
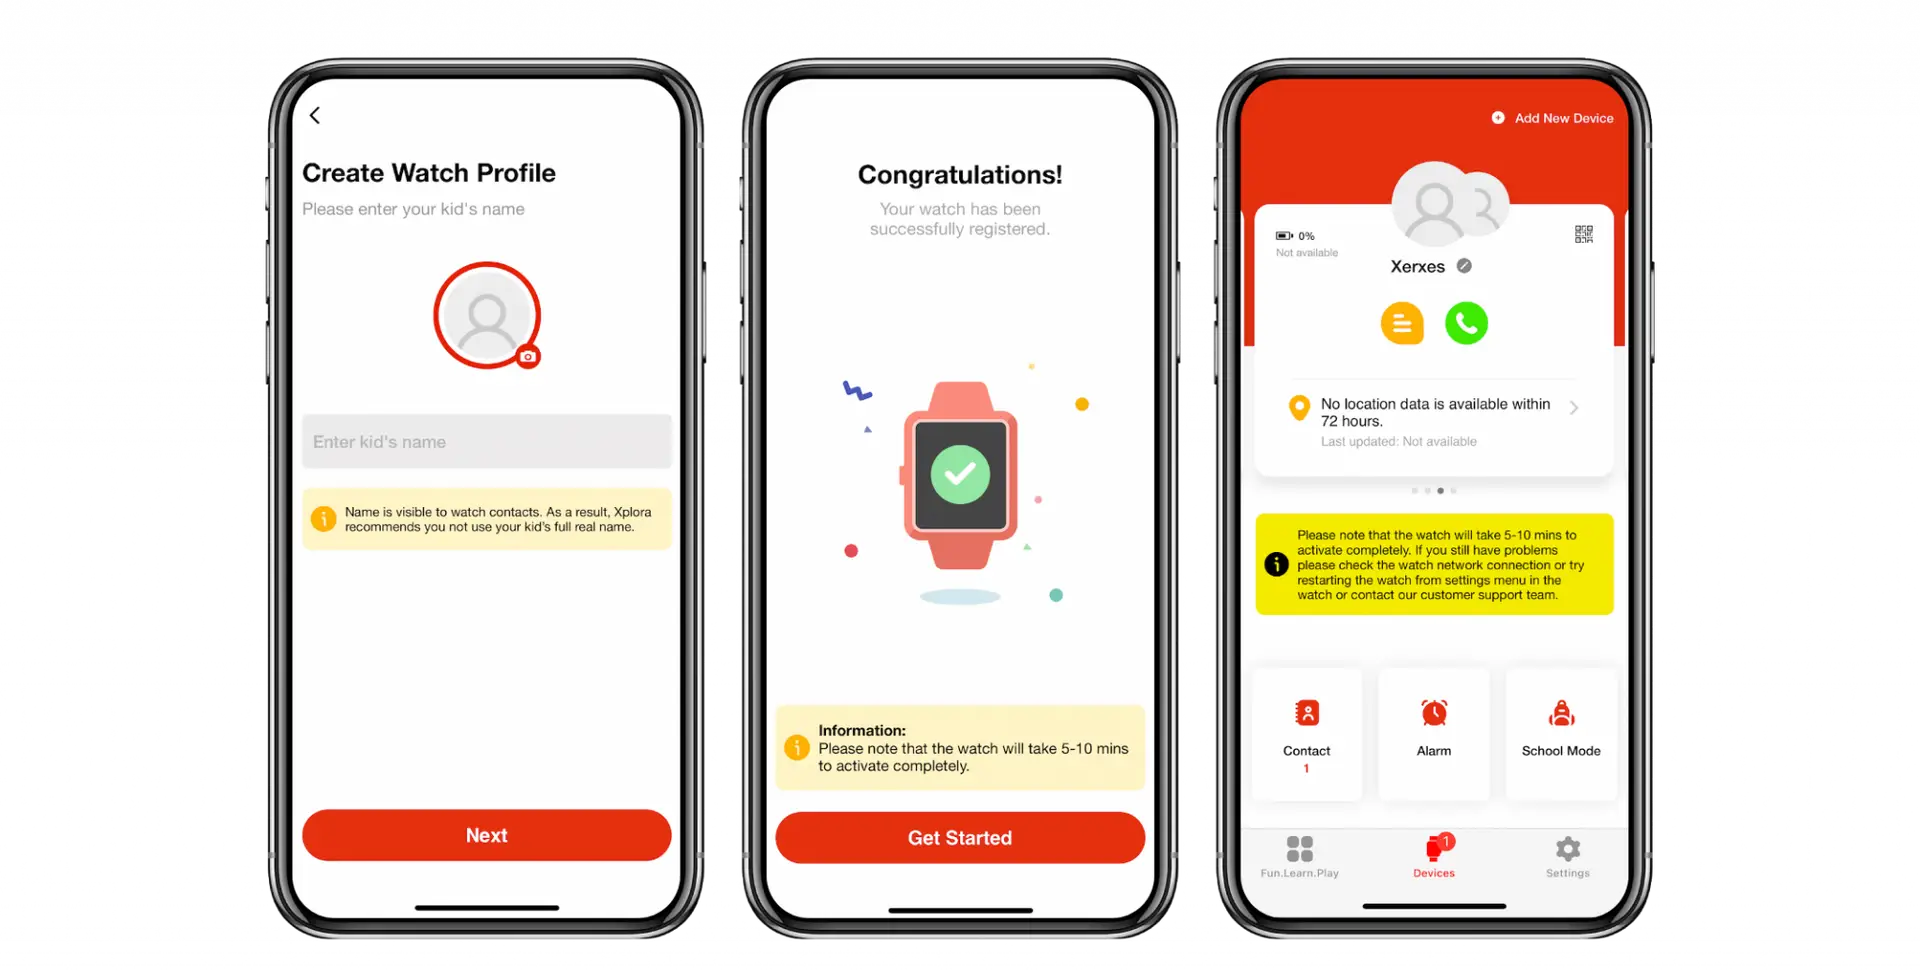
Step: 15
Set Up Watch Profile For Child
Enter your child’s name, and then press “Next.”
Congratulations the watch is activated. (Please note that this can take 5-10 minutes to complete.)
Press “Get Started.” This takes you to the main screen on the Xplora App. You can now see your child’s profile. A pop up will appear on the watch letting you know that activation has been completed.
Select your preferred language and press the “>” symbol in the upper right hand corner. This will take you to the default watch display.
The info screens are as follows:
Track your activity
Participate in adventures
Win prizes
Xplora for kids
Step 16:
Your Child's Watch is Activated & Needs to be Restarted
Now that your child’s device is activated, your next step is to restart the device.
From the home screen, swipe left until you see the Settings icon. Select the Settings icon. Scroll down, and select “Restart.” Your child’s watch will now restart and you can begin using it. We suggest doing a test call to make sure you’ve set the watch up correctly.
Next, you can start experiencing the fun features of the Xplora App.
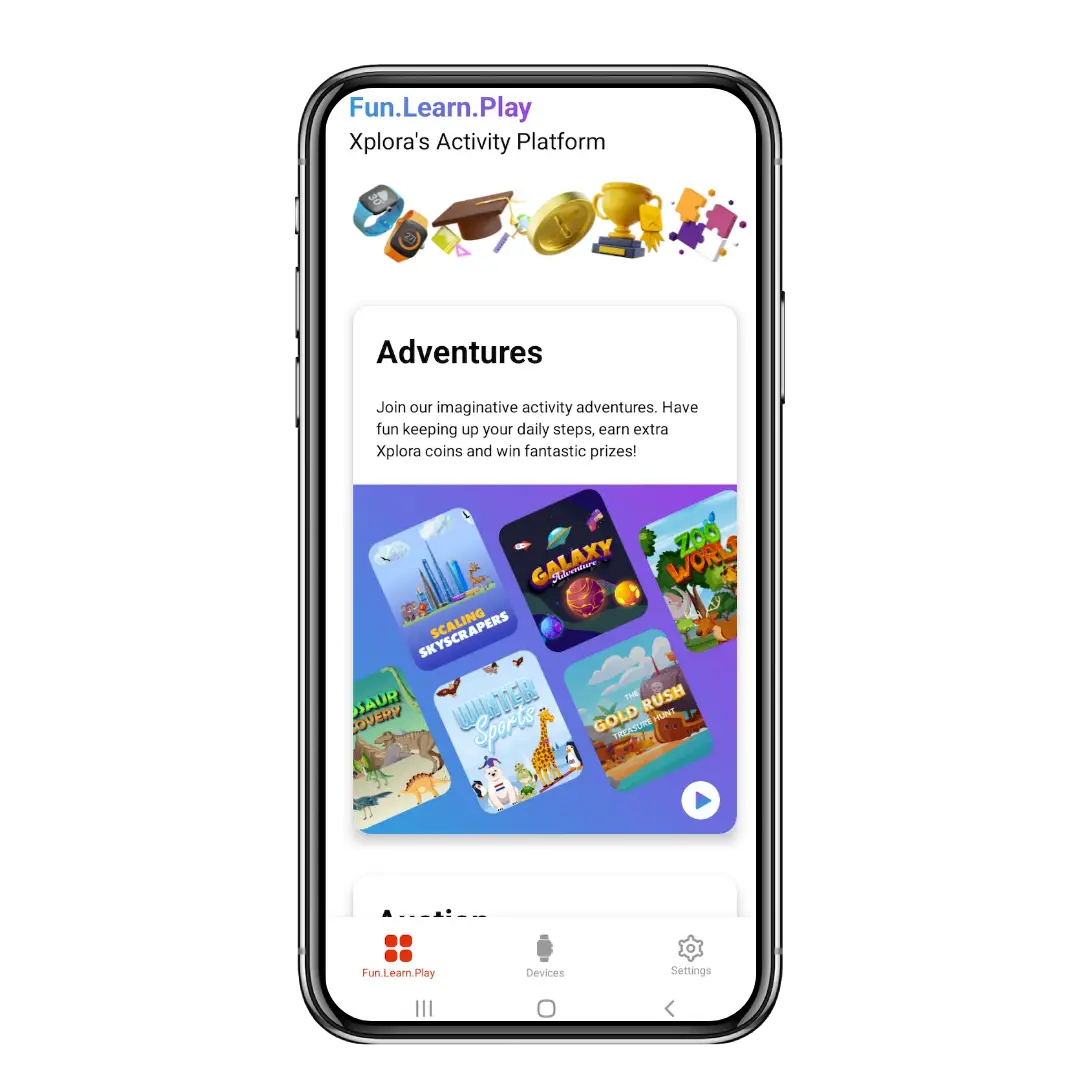
Step 17:
Accessing Xplora's Activity Platform
Now, you can explore the Activity Platform. Use your Xplora account login credentials to log in to the Activity Platform by clicking on “Login” in the upper right hand corner.
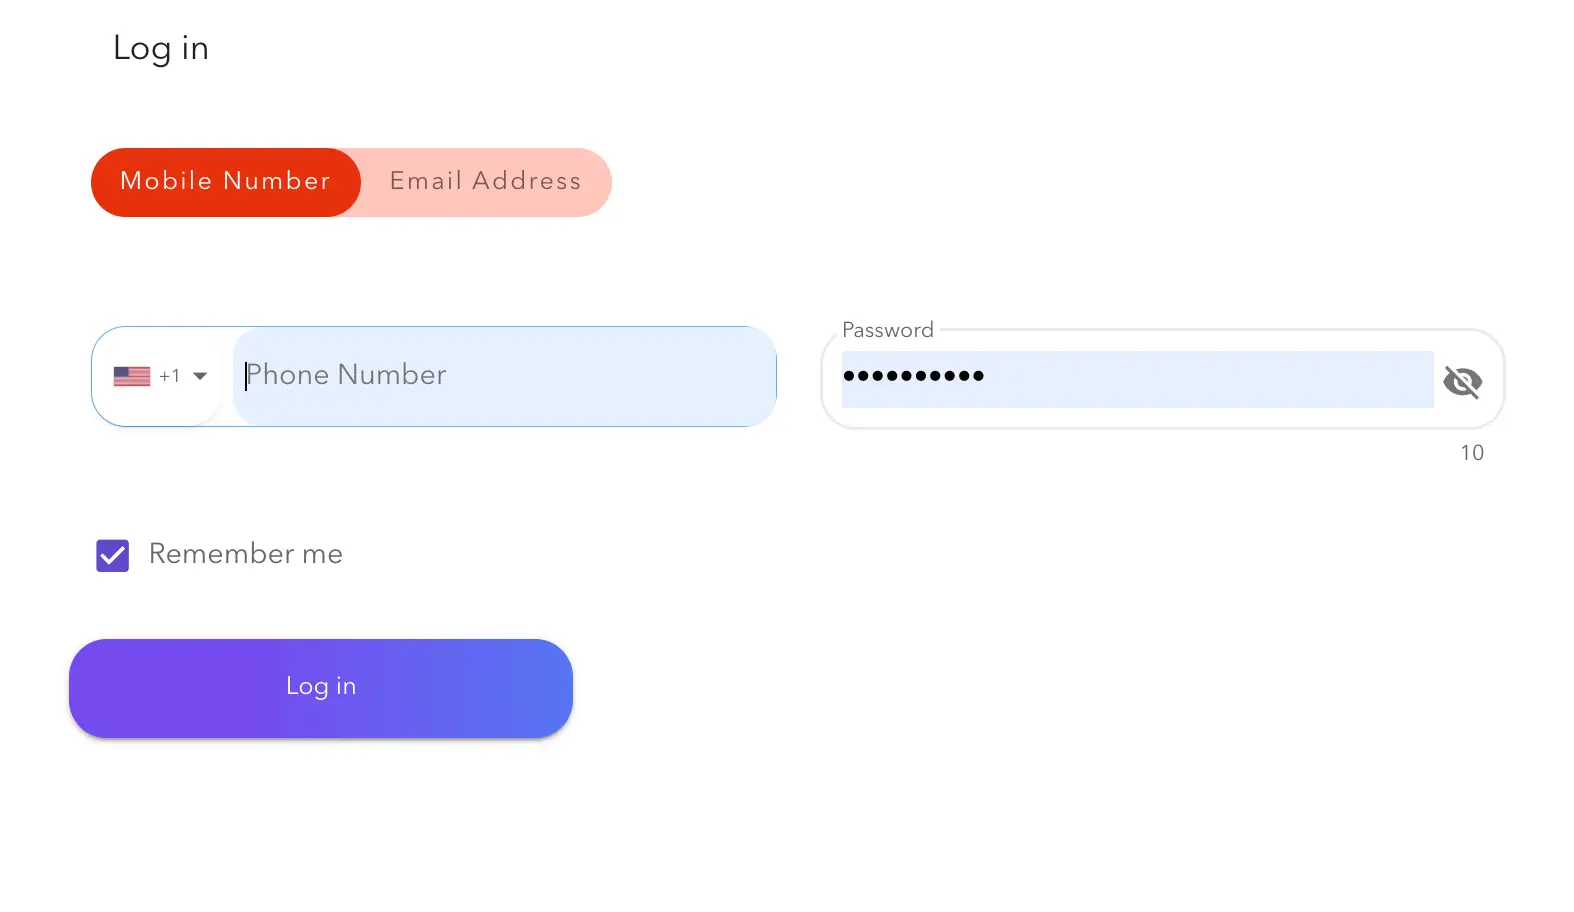
Step 18:
Selecting Your Login Method
Select if you want to log in with your Mobile Number or Email Address.
Note: Use the same number or email that you used to set up your Xplora account in the Xplora App.
Enter your Xplora password, and click “Log In.”
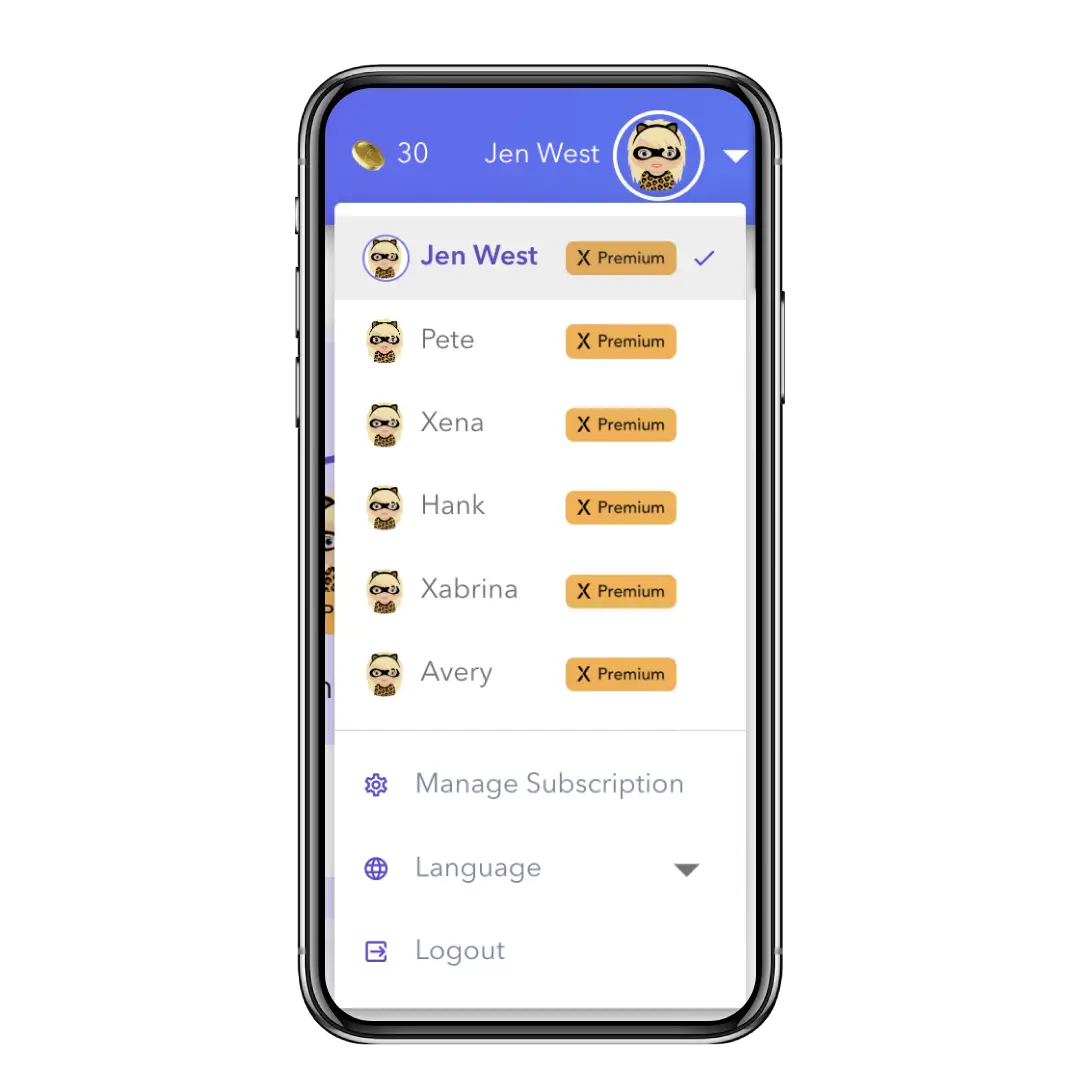
Step 19:
How To See Your Child's Profile
Once you’re logged in, the default dashboard is for the parents profile. In the upper right hand corner, click the drop down menu (down arrow) to switch to your child’s profile.
Step 20:
Upgrade To A Premium Account (Optional)
The default account-type is a Freemium account with locked Premium features. These features can be unlocked by upgrading to Premium. Premium features and options are indicated with the X Premium icon.
Select any of the Premium items to upgrade your account.
Still have questions?
Can’t find the answer you’re looking for? Please chat with our friendly team.